Overview #
olive™ EdgeIO is a robotics optimized System on Module (SOM) that weighs only 5 grams, is capable of running both ROS and ROS 2 simultaneously and is the key to building high-performance, industry-leading software-defined robot hardware components.
Key features #
- 5 grams
- 32 mm x 32 mm footprint
- ROS and ROS 2-support
- Debian-based. Production-grade software stack and OS included
Components #
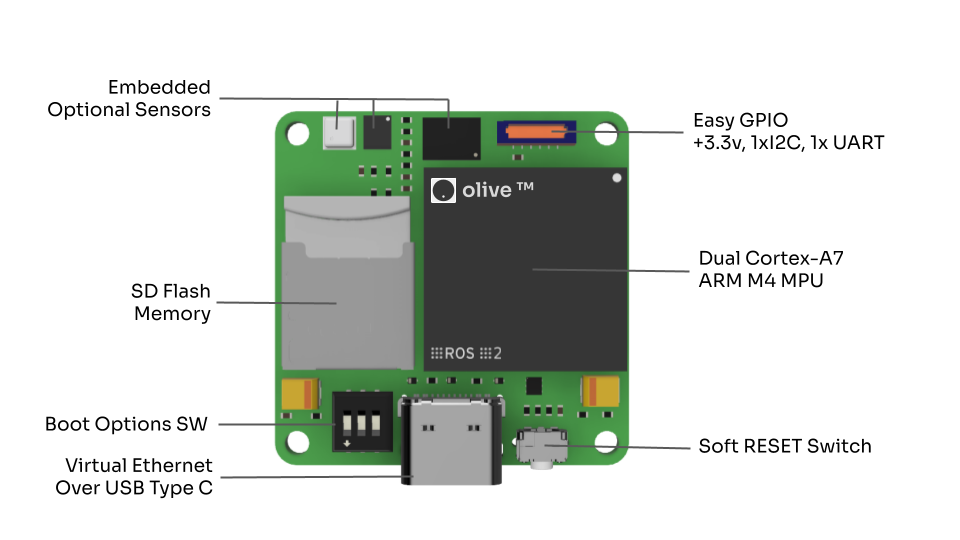
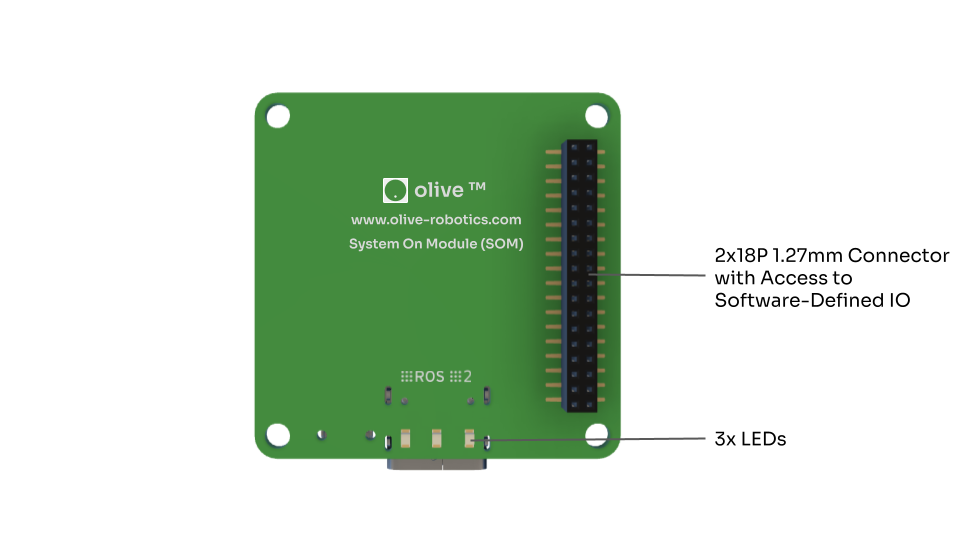
Layout #
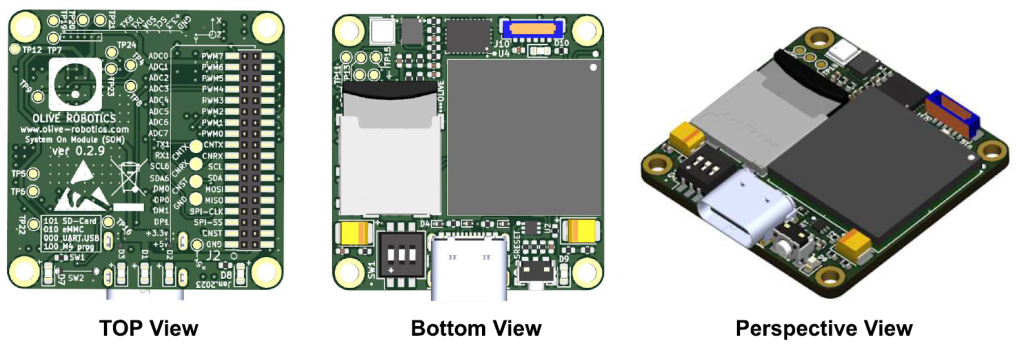
Technical Specification #
| TECH SPECS | DETAILS |
|---|---|
| FORM FACTOR | |
| Dimensions | 32mm x 32mm x 4mm |
| Weight | 5 grams |
| PROCESSOR UNIT | |
| Application Processor | Dual Cortex-A7 up to 800 MHz |
| Real-Time Processor | Cortex-M4 MPU up to 200 MHz |
| MEMORY | |
| On Chip (SoC) | 512 MB RAM |
| On Chip EEPROM (SoC) | 512 Bytes x 8 |
| On SOM | Up to 512 GByte SD Flash |
| CONNECTIVITY | |
| High-Speed Connectivity | 1x Virtual Ethernet over USB-C (up to 0.5 Gbps) |
| Other I/O | 1x USB 2.0 Host, 2x UART, 2x I2C, 1x SPI, 8x ADC, 8x PWM |
| SOFTWARE | |
| Yocto BSP available for batch purchases | Linux Kernel – Linux 5.10 |
| Operating System | Debian 11 |
| Communication middleware | eProsima Fast DDS and Apache Cyclone DDS |
| Robotic Operating Systems | ROS Noetic Ninjemys, ROS 2 Humble Hawksbill |
| POWER AND THERMAL | |
| Power Consumption | <1W (1.5 W max) |
| Voltage | Single 5.0v |
| Max Current | 300mA |
| Temperature Range | Commercial 0°C to 85°C / Industrial -40°C to +85°C |
Versions #
| Feature | OLVX EIO-U01X08P-A | OLVX EIO-U01X08P-C |
|---|---|---|
| ADC input | 8x (Max Input Voltage 3.3V) | 3x (Max Input Voltage 3.3V) |
| PWM output | 8x (Max IO Voltage 3.3V) | 8x (Max IO Voltage 3.3V) |
| Serial | 1x (Max Speed 3Mbps) | 1x (Max Speed 3Mbps) |
| I2C | 2x (Max Speed 1MHz) | 2x (Max Speed 1MHz) |
| SPI | 1x (Max Speed 5MHz) | 1x (Max Speed 5MHz) |
| USB | 1x USB 2.0 | 1x USB |
| CAN | Not available | 1x (Max Speed 5Mbps) |
Hardware Quick Setup #
SD card #
Locate the 3-pos DIP switch on the SOM module. Before proceeding, it must be set to the 101 position. This configuration allows the SOM to boot from the SD card. Ensure the SD card is properly seated and secured.
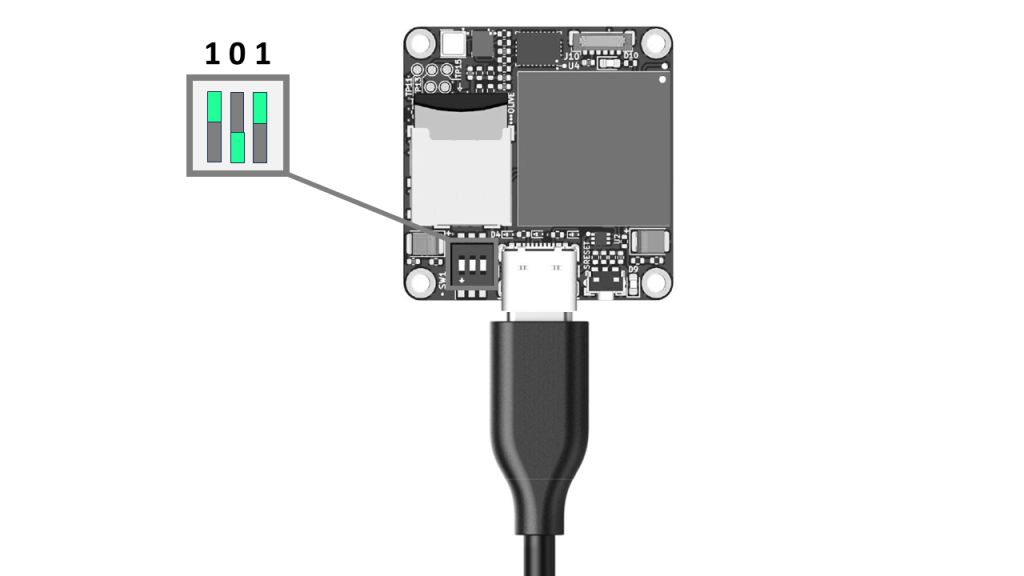
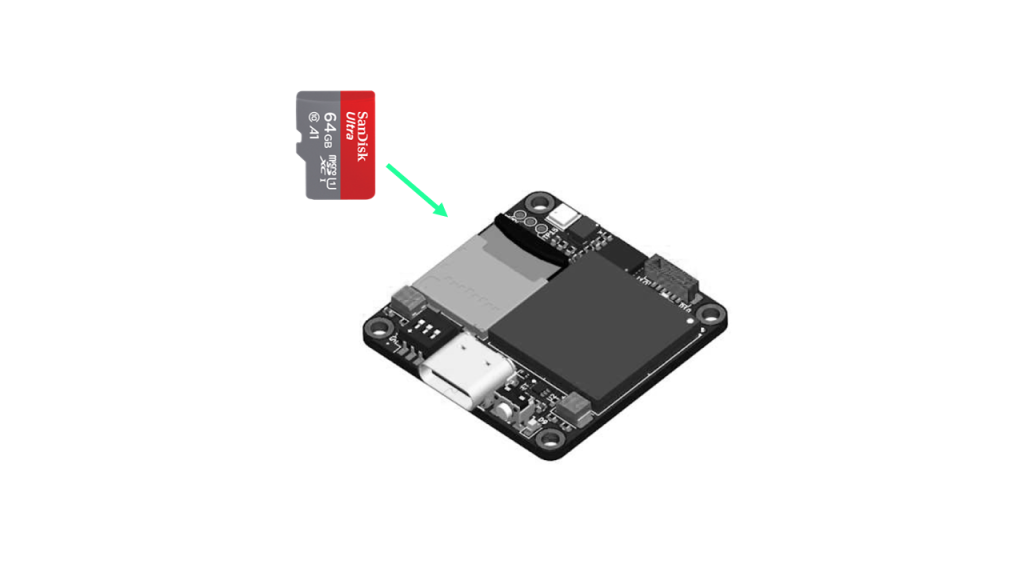
Connect the SOM with a USB-C cable to your computer.
LEDs #
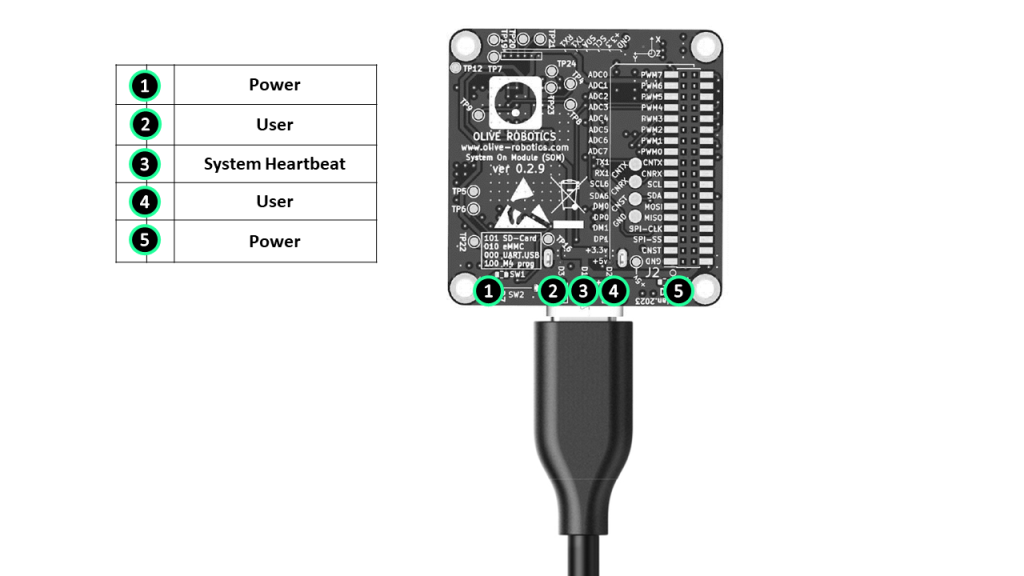
Your System-on-Module (SOM) is equipped with five LEDs, designed to provide critical information about the system’s status.
The two LEDs located on the sides are voltage indicators, which remain lit to signal the availability of power to the system. They provide assurance that the system is receiving adequate power supply.
Centrally located are three more LEDs, serving as the software status of the system.
The middlemost LED acts as the heartbeat of your system. Think of it as a health check; when it’s flashing, you can be sure your system is alive and well.
Flanking this heart-beat LED on the sides are two user-related status indicators. You can control them according to your application.
These five LEDs, working together, ensure you always have a clear picture of your SOM’s status and health.
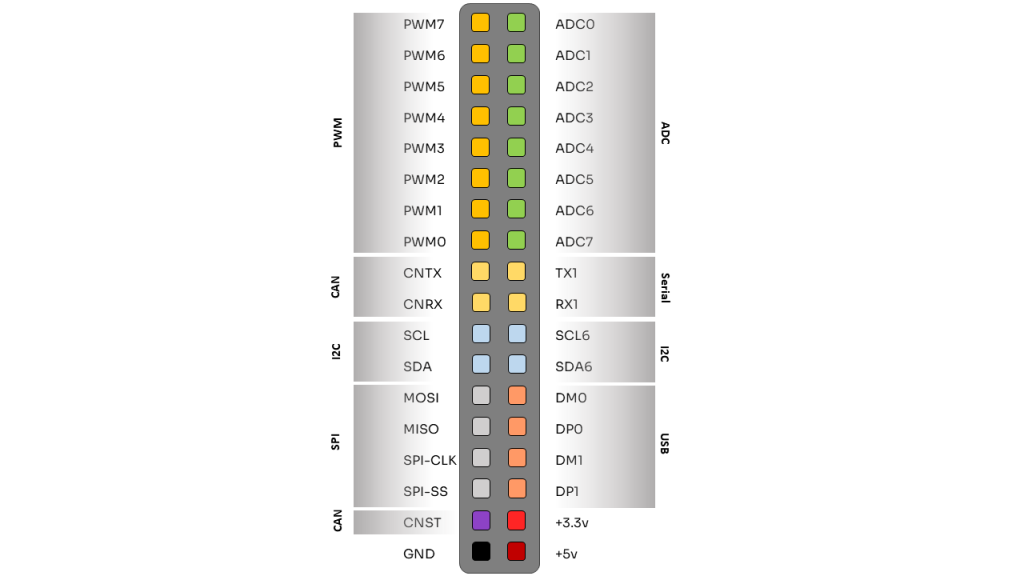
Pin Description #
Scan for I2C sensors #
sudo i2c detect -y 11 is the first IMU sensor
0  1  2  3  4  5  6  7  8  9  a  b  c  d  e  f
00:                         -- -- -- -- -- -- -- --
10: -- -- -- -- -- -- -- -- -- -- -- -- -- -- -- --
20: -- -- -- -- -- -- -- -- 28 -- -- -- -- -- -- --
30: -- -- -- -- -- -- -- -- -- -- -- -- -- -- -- --
40: -- -- -- -- -- -- -- -- -- -- -- -- -- -- -- --
50: -- -- -- -- -- -- -- -- -- -- -- -- -- -- -- --
60: -- -- -- -- -- -- -- -- -- -- -- -- -- -- -- --
70: -- -- -- -- -- -- -- --
sudo i2c detect -y 22 is the second IMU sensor
0  1  2  3  4  5  6  7  8  9  a  b  c  d  e  f
00:                         -- -- -- -- -- -- -- --
10: -- -- -- -- -- -- -- -- -- -- -- -- -- -- -- --
20: -- -- -- -- -- -- -- -- -- -- -- -- -- -- -- --
30: -- -- -- -- -- -- -- -- -- -- -- -- -- -- -- --
40: -- -- -- -- -- -- -- -- -- -- -- -- -- -- -- --
50: -- -- -- -- -- -- -- -- -- -- -- -- -- -- -- --
60: -- -- -- -- -- -- -- -- 68 -- -- -- -- -- -- --
70: -- -- -- -- -- -- -- --
sudo i2c detect -y 33 is the Power Managment System + EEPROM + Barometer
0  1  2  3  4  5  6  7  8  9  a  b  c  d  e  f
00:                         -- -- -- -- -- -- -- --
10: -- -- -- -- -- -- -- -- -- -- -- -- -- -- -- --
20: -- -- -- -- -- -- -- -- -- -- -- -- -- -- -- --
30: -- -- -- UU -- -- -- -- -- -- -- -- -- -- -- --
40: -- -- -- -- -- -- -- -- -- -- -- -- -- -- -- --
50: UU -- -- -- -- -- -- -- -- -- -- -- -- -- -- --
60: -- -- -- -- -- -- -- -- -- -- -- -- -- -- -- --
70: -- -- -- -- -- -- 76 --
USB Connection check #
on you main computer try
ls usb
you should see the device in your USB connected device list as follows:
Bus 001 Device 010: ID 1d6b:0104 Linux Foundation Multifunction Composite GadgetGPIO Scan #
You can use this command to do GPIO Scan
sudo gpioinfo
gpiochip3 line 10: "led-dcm"  output  active-high [User]
gpiochip8 line 9: "led-heartbeat" output  active-high [Kernel]
gpiochip9 line 7: "led-user"  output  active-high [User]
gpiochip7 line 8: "reset button"  input  active-high [User]
sudo gpiodetect
gpiochip0 [GPIOA] (16 lines)
gpiochip1 [GPIOB] (16 lines)
gpiochip2 [GPIOC] (16 lines)
gpiochip3 [GPIOD] (16 lines)
gpiochip4 [GPIOE] (16 lines)
gpiochip5 [GPIOF] (16 lines)
gpiochip6 [GPIOG] (16 lines)
gpiochip7 [GPIOH] (16 lines)
gpiochip8 [GPIOI] (16 lines)
gpiochip9 [GPIOZ] (16 lines)
Examples #
We have prepared several examples which you can see in our github page:
https://github.com/olive-robotics/olv_som_playground_py