This documentation provides comprehensive information about Olive Robotics’ advanced modular robotics platform. Our mission is to empower professionals, researchers, educators, and developers with high-performance, interoperable hardware and software tools to accelerate the development and deployment of robotic systems.
Olive Robotics offers a versatile portfolio of modular components—including sensors, actuators, communication interfaces, processing modules, power supplies, and system-on-modules (SoMs)—all designed with native ROS 2 integration. These modules are engineered to enable scalable, flexible, and high-performance robotics solutions across various applications.
In addition to hardware, we provide a suite of ROS 2-based software packages, including applications and example projects, to support the configuration, programming, and real-time control of robotic systems.
Within this documentation, you will find detailed technical specifications, setup instructions, usage guidelines, and development resources. Use the navigation panel on the left to explore different sections, or leverage the search bar to quickly locate specific topics.
For further assistance or technical support, please contact us at support@olive-robotics.com. Our team is committed to ensuring your success with our technologies.
Thank you for choosing Olive Robotics. We look forward to supporting your innovation in robotics.
Overview #
At Olive Robotics, our mission is to make robotics accessible and affordable for everyone. We believe that robotics has the potential to transform our world and improve our lives in countless ways, and we want to help make that happen.
In addition to our hardware products, we also provide ROS2-based apps and examples packages to help you program and control your robotic systems. Our web-based GUI provides a wide range of capabilities for configuring, controlling, and testing out components, and our examples packages in C++ and Python provide a starting point for using our hardware in action.
Overall, our products and services make it possible to create complex and intelligent robotic systems in days or weeks, instead of months or years. Whether you are a student, researcher, developer, or hobbyist, Olive Robotics can help you to unlock the potential of robotics and make your vision a reality.
Start with one of the following options to get started with your Olive components:
- Run through the Quickstart Guide to connect and access your device and start reading data – no programming is required.
- Jump into the full tutorial and documentation for each component for more information and advanced concepts (menu on the left).
- Start with one of the customizable Olive kits complete with example ROS2 codes to hit the ground running, and then modify to suit your needs. (menu on the left)
- Pick one of our example packages written in C++ and Python and dive right into software development.
Next Steps #
After becoming familiar with the basic functions of Olive components, there are multiple ways to communicate and configure their behavior.
Olive Robot Components #
Our robot components are the foundation of our modular robotic building blocks, and they provide the physical sensors, actuators, and other components that you need to build and program your own robotic systems. The menu on the left gives you access to dedicated instructions for each of our hardware products, including technical specifications, user instructions, and examples.
Olive Embedded Web-based Graphical User Interface #
The Olive Embedded web GUI is a user-friendly interface for configuring, controlling, and testing our modular robotic building blocks. It provides a wide range of capabilities for setting up and controlling our hardware components, including setting parameters, sending commands, and visualizing sensor data.
This web GUI is a web service that runs directly on the Olive hardware module, and it connects to your host PC over a standard Ethernet connection (via the USB-C connector). This means that you can access and control our hardware components from any web browser, on any device, without having to install any additional software.
To access the web GUI, just connect the Olive component to your computer using a standard USB-C cable and wait for it to appear in your network devices. Then just type the standard IP address 192.168.7.1 (old versions: 10.42.0.7) into your web browser of choice and you’re ready to go.
Olive ROS2 Software Packages and Examples #
ROS and ROS2 are a core part of the Olive range of products and every Olive hardware component runs ROS out of the box – no setup required.
The Olive ROS2 software packages and examples are a key part of our product offering, and they provide everything you need to start programming and controlling your robotic systems with our hardware. Our ROS2 packages provide examples of using our hardware in action. They are designed to be easy to use and available in both C++ and Python, so you can choose whichever language you are most comfortable with.
In addition to the examples, we also provide a range of tools and utilities to help you work with our ROS2 packages. These include scripts for building and running the examples, as well as utilities for monitoring and debugging your code.
For more information please visit our github page:
https://github.com/olive-robotics
What is Olive Robotic Component? #
Olive One is a brand of Smart Interoperable Components developed by Olive Robotics GmbH for use in any robotic system.
- All-in-one module with a variety of elements required to drive a robot without other devices. All you need is a host PC with a USB C port and ROS communication to operate a robot.
- We offer various source codes and tools to help first-timers with Olive to operate a robot within a day.
- Olive is compatible with any system or host controller. All you need is a ROS2 framework and communication to operate a robot made with Olive modules.

The modules also can be daisy chain and connect to each other:
Communication #
Modules are connected to host computers via standard USB Type C and standard commercially available HUB equipment with PD support. In the host computer network, every client needs to obtain an IP address in order to communicate with the main PC or with other connected modules. If there is only one module connected to the main PC, the module will get an IP address automatically from the host PC. If more than one module is connected to the computer and user wants to establish a network along all the modules, the bridge connection must be established in the main PC.
There are three ways to setup the IP address on the host computer:
- Dynamic Address Assignment (DHCP)
- Static Address Assignment
- Bridge Connections to Multiple Modules
| Summary / Description | Diagram |
|---|---|
| Single Module – Network w/ DHCP or Static IP The module stablished the standard wired network over a single USB port that is connected to the development host computer. This is probably the most straightforward setup. | 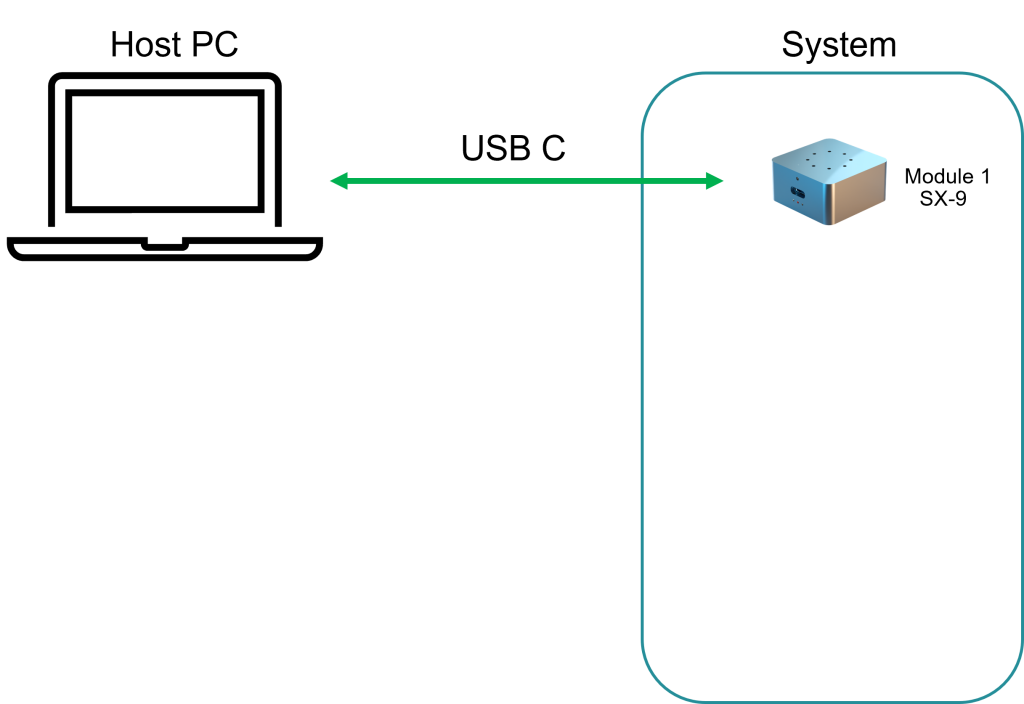 |
| Multiple Actuator Robot – Network w/ Bridge The robot actuator modules are on a network with their own internal daisy chain connection, and they connect to the development host computer using the last USB interface from the module’s network. The connections on the host computer must be configured as a bridge network in order to enable all the modules to be in the same subnet. | 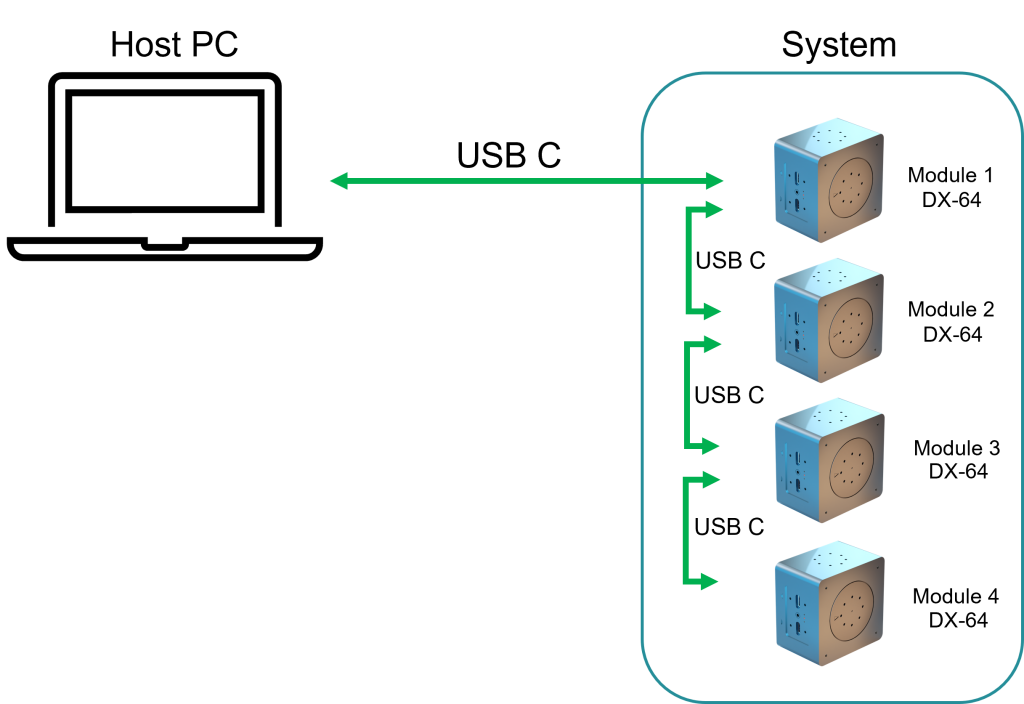 |
| Multiple Actuator and Sensor Robot – Network w/ Bridge The robot actuator modules, along with the last sensor, are on a network with their own internal daisy chain connection, and they connect to the development host computer using the last USB interface from the module’s network. The connections on the host computer must be configured as a bridge network in order to enable all the modules to be in the same subnet. | 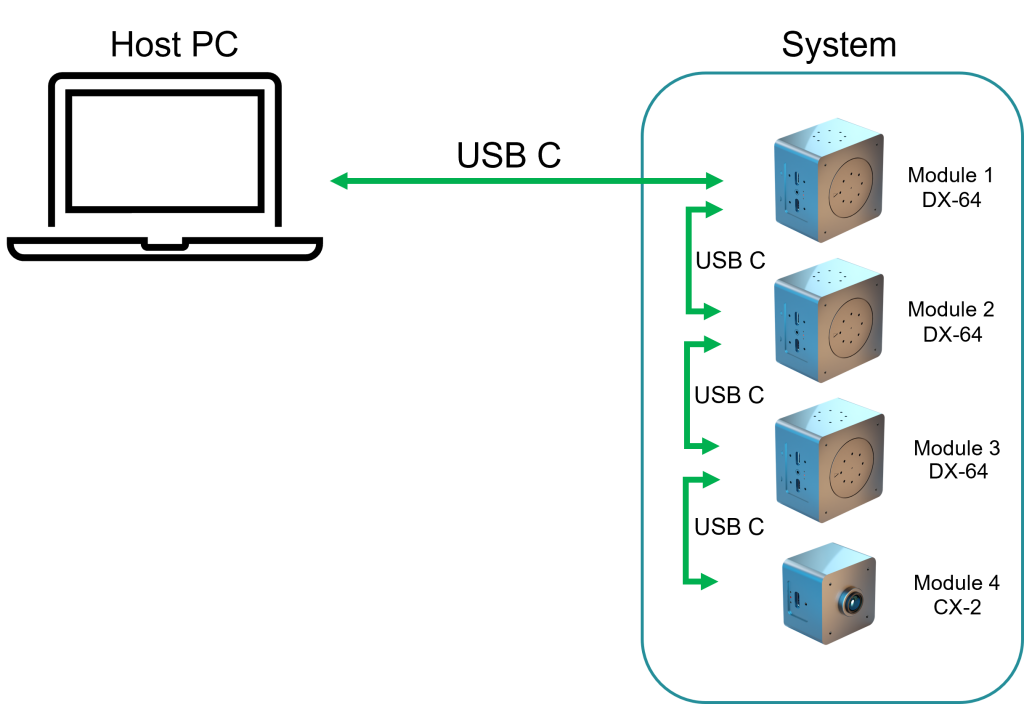 |
| Multiple Actuator and Sensor Robot – Hub | 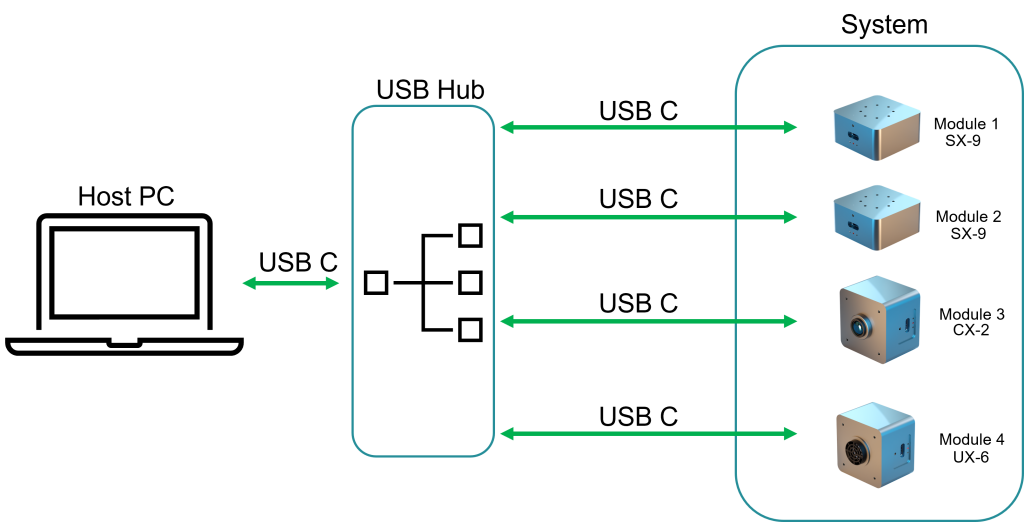 |
