Network Configuration
1) Indipended device connection
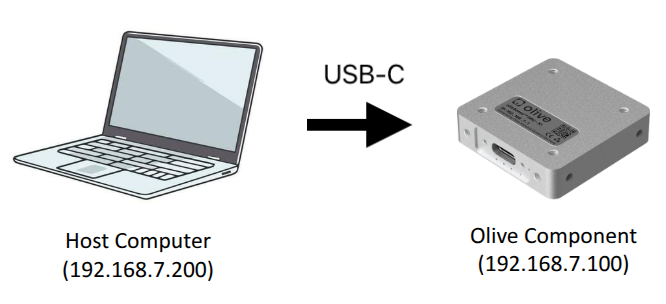
You can set and update your device IP, netmask and gateway from the device dashboard GUI. More information Here:
2) Multi-Device Interoperability
Multi-Device / Servo Daisy Chain
When you connect multiple Olive components to your computer, they will appear as several Ethernet devices in your network adapter settings. In this configuration, it’s necessary to either set up an internal network bridge or define static routes to ensure all devices are properly connected to your computer and can be pinged.
Daisy chain means you have an Olive servo in your setup and therefore you will need the Olive power spliter too. You can see the example network diagram below. Please note that the Olive camera in the daisy chain will work without automatically but for the IMU you will need to setup the connection manually.

Alternatively, you can daisy-chain multiple servos, adding a camera or IMU at the end of the chain. In daisy chain mode, network bridging is handled automatically, requiring no additional configuration.
In summary, using the daisy chain method results in only one Ethernet device being visible in your network device list, but you can still access and ping all devices in the chain. Conversely, connecting multiple components without daisy-chaining will show multiple devices in your network list. This arrangement typically requires manual setup, involving the creation of a bridge network or the definition of static routes to integrate all Ethernet interfaces connected to Olive components. Follow the relevant procedures to establish this setup.
Solution 1 (Statics Routing)
if this is your example network setup:

[imu 1: 10.42.0.7] => [pc interface: 10.42.0.1]
[imu 2: 10.42.0.8] => [pc interface: 10.42.0.2]
then on your main pc try:
sudo ip route add 10.42.0.7 via 10.42.0.1
sudo ip route add 10.42.0.8 via 10.42.0.2
Solution 2 (Network Bridge)
- Install the bridge-utils package:
sudo apt install bridge-utils
- First use the command “ifconfig” to see your current network interfaces:
ifconfigAs you can see in our example we have two Olive devices (enxa80000000001) and (enxa82c8d3c047b). We want to create a single bridge to internally connect this two interfaces and represents them with one ip address.

- Open the Network Manager connection editor GUI:
nm-connection-editor

click on (+) and select “Bridge” from the list

- In the Bridge connection Editor add your Olive network interfaces. Each time select “Add” then select “Ethernet”


from the device list select the Olive devices by the interface name or the MAC address. Here (enxa80000000001) and (enxa82c8d3c047b).

Once you done this step you will two interfaces in the list

- Change the Bridge ip to manual mode and define a static ip like:

It is better to select “10.42.0.x” or better “10.42.0.1” as shown in the picture.
- Remove extra (old) netwrok connections.


- Check the bridge connection:
sudo brctl show
This should display the bridge connection status between the Olive components.

- Test the connection with the “ping” command to ensure eveything is correct. In our case the first component has the ip address “10.42.0.7” and the second one has “10.42.0.8”.

Behind NAT Network Configuration
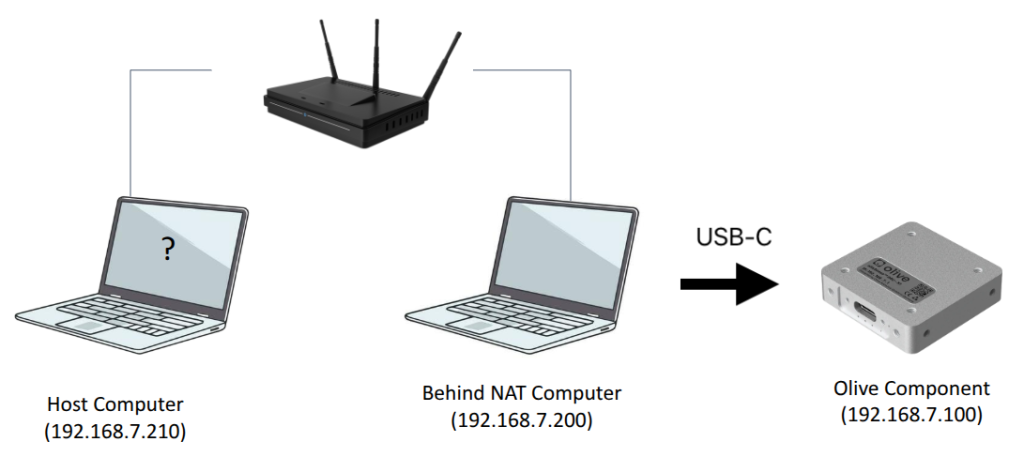
In the depicted network setup, the Olive Component (an IMU sensor with a ROS 2 native stack) is connected via USB-C to a Behind NAT Computer (192.168.7.200), and this system is able to communicate directly with the IMU at 192.168.7.100. However, the Host Computer (192.168.7.210) is only connected to the Behind NAT Computer via a shared local network and not directly to the USB-based network where the IMU resides. This creates a network segmentation issue, meaning the Host Computer cannot see the ROS 2 topics published by the IMU, such as /olive/imu/id001/ahrs, because the IMU exists on a virtual USB network interface that is isolated from the main LAN.
The Problem
ROS 2 uses DDS (Data Distribution Service), which relies heavily on multicast and assumes nodes are on the same Layer 2 broadcast domain (i.e., same subnet). In this case, since the Host Computer and the IMU are on different interfaces and subnets, they cannot automatically discover each other or communicate directly.
Solution 1: Use a ROS 2 Topic Re-publisher
A straightforward solution is to re-publish the IMU topic from the Behind NAT Computer (which has direct access to the sensor) so that it becomes visible and available on the Host Computer’s network.
You can use the terminal or a ROS 2 launch file to republish the topic like this:
ros2 run topic_tools relay /olive/imu/id001/imu /imu_relayThen, on the Host Computer, you subscribe to the relayed topic:
ros2 topic echo /imu_relay
This setup allows your Host Computer to receive IMU data indirectly, even though it cannot access the original topic directly due to network segmentation.Solution 2: (Advance)
You can turn the Behind NAT Computer into a gateway/router to allow the Host Computer to access devices (like your IMU) that are on a different subnet/interface — in this case, the USB-C virtual interface connected to enx0a569ff7a687.
On Behind NAT Computer (192.168.7.200):
Step 1: Enable IP Forwarding
sudo sysctl -w net.ipv4.ip_forward=1Make it permanent:
echo "net.ipv4.ip_forward = 1" | sudo tee -a /etc/sysctl.conf
sudo sysctl -p
Step 2: Set up NAT (MASQUERADE)
sudo iptables -t nat -A POSTROUTING -o enx0a569ff7a687 -j MASQUERADEThis makes it possible for the IMU to reply to packets that came from the Host via the NAT PC.
On Host Computer (192.168.7.210):
Step 3: Add Static Route to IMU through NAT
sudo ip route add 192.168.7.100 via 192.168.7.200 dev eth0This tells the Host Computer to send packets for the IMU via the NAT computer.
ros2 topic listYou should see all the topics now!
