Data Distribution Service (DDS)
Supported DDS implimentations
| Product name | License | RMW implementation | Status |
|---|---|---|---|
| eProsima Fast DDS | Apache 2 | rmw_fastrtps_cpp |  |
| Eclipse Cyclone DDS | Eclipse Public License v2.0 | rmw_cyclonedds_cpp | |
| RTI Connext | commercial, research | rmw_connext_cpp | Test in progress |
| Zetascale Zenoh | commercial, research | rmw_zenoh | Test in progress |
1. Fast DDS (formerly Fast RTPS)
The default DDS implementation for most ROS2 distributions.
- Repository: https://github.com/eProsima/Fast-DDS
- RMW package:
rmw_fastrtps_cpp
Example Configuration for Fast DDS on Olive Device
This configuration is maintained automatically in the system, and you don’t need to change it. However, it’s useful to be familiar with it. If desired, you can extend this configuration to your host computer as well. This becomes handy when you wish to modify the buffer size or blacklist certain network interfaces that you don’t want to use in ROS2.
The configuraiton is located in
/opt/olive/config/current/fastdds.xml<?xml version="1.0" encoding="UTF-8" ?>
<dds>
<profiles xmlns="http://www.eprosima.com/XMLSchemas/fastRTPS_Profiles">
<transport_descriptors>
<transport_descriptor>
<transport_id>udp_config</transport_id>
<type>UDPv4</type>
<interfaceWhiteList>
<address>192.168.7.100</address>
</interfaceWhiteList>
<sendBufferSize>4259840</sendBufferSize>
<receiveBufferSize>4259840</receiveBufferSize>
</transport_descriptor>
</transport_descriptors>
<participant profile_name="participant_xml_profile_qos_socketbuffers" is_default_profile="true">
<rtps>
<userTransports>
<transport_id>udp_config</transport_id>
</userTransports>
<!-- Buffer sizes, has big effect on performance.
* Values
* Maximum set on boot: 2147483647 ~ 20MB,
* 4259840 ~ 4MB.
* 2129920 ~ 2MB - performance similar to 4MB
* 1048576 ~ 1MB - worse performance
* For some reason, setting the largest value decreases performance.
* Make sure to match the transport_descriptor values
-->
<!-- See comments in jetson.xml -->
<sendSocketBufferSize>4259840</sendSocketBufferSize>
<listenSocketBufferSize>4259840</listenSocketBufferSize><!-- Maximum set on boot: 2147483647, moderate is 2129920 -->
<useBuiltinTransports>false</useBuiltinTransports>
</rtps>
</participant>
</profiles>
</dds>2. Cyclone DDS
A lightweight, high-performance DDS implementation by Eclipse Foundation.
- Repository: https://github.com/eclipse-cyclonedds/cyclonedds
- RMW package:
rmw_cyclonedds_cpp
These are the most common DDS implementations used in ROS2. To switch between them, follow the instructions from the previous answer to set the RMW_IMPLEMENTATION environment variable to the desired RMW package.
The following ROS2 DDS implementations are available and open-source for ROS2 which you can change it acording to your need:
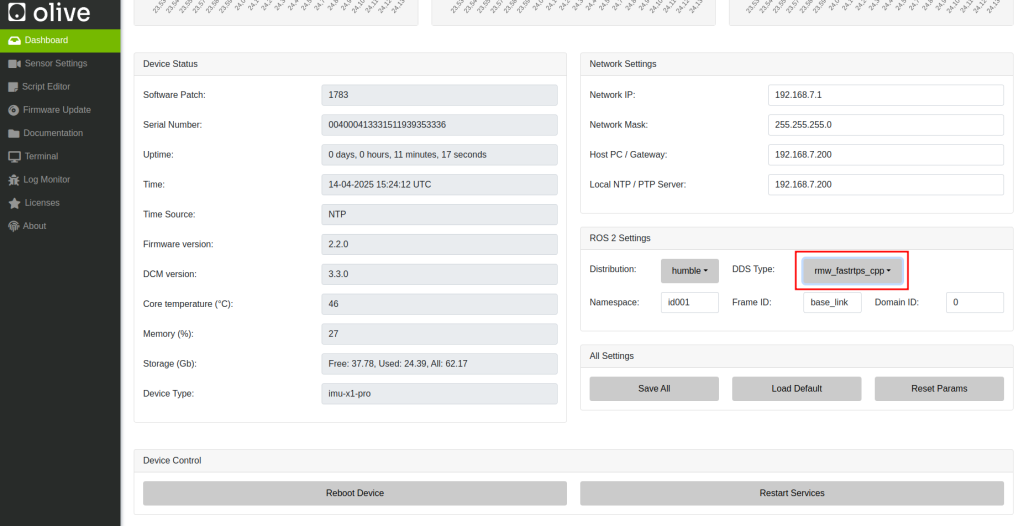
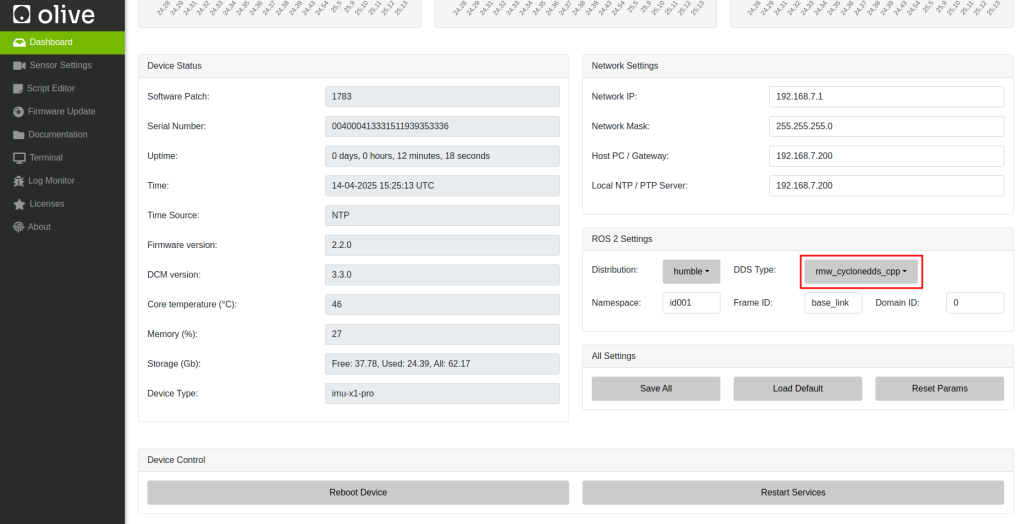
How to change DDS middleware on the Olive device?
The default DDS implementation on Olive components are Fast DDS. However Cyclone DDS is also supported. You can change the middleware implementation using the GUI:
How to change ROS2 DDS implementation to Cyclone DDS for the host computer?
Follow these steps to change the ROS2 DDS implementation to Cyclone DDS:
1. Install Cyclone DDS
First, make sure that Cyclone DDS is installed on your system. You can install it using the following commands for different platforms:
- Ubuntu:
sudo apt update
sudo apt install ros-humble-rmw-cyclonedds-cpp- macOS, Windows, or building from source:
Please refer to the official Cyclone DDS installation instructions at
https://github.com/eclipse-cyclonedds/cyclonedds/blob/master/INSTALL.md
2. Set Cyclone DDS as the default DDS implementation
You can change the default DDS implementation by setting the RMW_IMPLEMENTATION environment variable. You can do this either temporarily or permanently.
- Temporarily (for the current terminal session):
- Bash (Linux and macOS):
export RMW_IMPLEMENTATION=rmw_cyclonedds_cpp - PowerShell (Windows):
$env:RMW_IMPLEMENTATION="rmw_cyclonedds_cpp"
After setting the variable, you can run your ROS2 nodes in the same terminal, and they will use Cyclone DDS.
- Permanently:
To make the change permanent, add the corresponding export or $env command to your shell configuration file. For Bash, this is typically .bashrc or .bash_profile (Linux) or .bash_profile (macOS). For PowerShell, this is typically the $PROFILE script.
How to Verify the change?
To ensure that your ROS2 nodes are using Cyclone DDS, you can run the following command:
ros2 doctor --reportLook for the “middleware” section in the report. It should show “rmw_cyclonedds_cpp” as the active middleware.
That’s it! Now your ROS2 system is using Cyclone DDS as the default DDS implementation.
Example Configuration for Cyclone DDS on the host computer
INFO
On your host computer you need to tell Cyclone which network interface you want to use in your system. This is especially important when you have multiple network interfaces. In this example host IP is 192.168.7.200.
Then you need to add a variable in your .bashrc to define the location of your cyclone dds config. You need to tell where your cyclonedds.xml is located.
export CYCLONEDDS_URI="/home/[username]/cyclonedds.xml"then you need to stop and start the ros2 daemon.
ros2 daemon stop
ros2 daemon start
Put this configuration in your host computers cyclonedds.xml.
<?xml version="1.0" encoding="UTF-8" ?>
<CycloneDDS xmlns="https://cdds.io/config" xmlns:xsi="http://www.w3.org/2001/XMLSchema-instance" xsi:schemaLocation="https://cdds.io/config https://raw.githubusercontent.com/eclipse-cyclonedds/cyclonedds/master/etc/cyclonedds.xsd">
    <Domain Id="any">
        <General>
            <Interfaces>
                <NetworkInterface address="192.168.7.200" priority="default" multicast="default" />
            </Interfaces>
            <AllowMulticast>default</AllowMulticast>
            <MaxMessageSize>65500B</MaxMessageSize>
        </General>
        <Tracing>
            <Verbosity>finest</Verbosity>
            <OutputFile>cyclonedds.log</OutputFile>
        </Tracing>
    </Domain>
</CycloneDDS>
3) MoveIt Pro Docker DDS (Cyclone DDS)
This section shows how to make MoveIt Pro (Docker) communicate with Olive components over Cyclone DDS using the device’s 192.168.7.x link. MoveIt Pro ships with a Cyclone DDS setup that talks inside the container and with the host by default; we’ll bind it explicitly to the Olive USB-Ethernet interface and use unicast peers for deterministic discovery. docs.picknik.ai+1
What you’ll get
- Container ↔ Host ↔ Olive DDS comms over 192.168.7.x
- Predictable discovery (multicast off, explicit peers)
- Clean compatibility with MoveIt Pro’s default Cyclone DDS behavior and ROS 2 RMW selection docs.picknik.ai+1
Prerequisites
- MoveIt Pro (Docker) on the host; it uses Cyclone DDS by default. docs.picknik.ai
- Olive device reachable via USB-Ethernet 192.168.7.x (e.g., host
192.168.7.1, Olive192.168.7.2). - Cyclone DDS installed/available (ROS 2 Humble/Iron/Rolling include it), and familiarity with
CYCLONEDDS_URI. docs.ros.org+1
Step 1 — Identify interface & IPs
On the host (MoveIt Pro machine):
ip -4 a | grep -A2 -E '192\.168\.7\.'
# e.g., usb0 at 192.168.7.1
On the Olive internal computer:
ip -4 a | grep -A2 -E '192\.168\.7\.'
# e.g., usb0 at 192.168.7.2
Step 2 — Create Cyclone DDS XMLs
Bind Cyclone to the 192.168.7.x address, disable multicast, and list peers explicitly. This follows the official Cyclone DDS XML schema and configuration guide. Cyclone DDS
2.1 Host (MoveIt Pro side): ~/.ros/cyclonedds.xml
<?xml version="1.0" encoding="UTF-8"?>
<CycloneDDS xmlns="https://cdds.io/config"
            xmlns:xsi="http://www.w3.org/2001/XMLSchema-instance"
            xsi:schemaLocation="https://cdds.io/config https://raw.githubusercontent.com/eclipse-cyclonedds/cyclonedds/master/etc/cyclonedds.xsd">
  <Domain Id="any">
    <General>
      <Interfaces>
        <NetworkInterface address="192.168.7.1"/>
      </Interfaces>
      <AllowMulticast>false</AllowMulticast>
      <MaxMessageSize>65500B</MaxMessageSize>
    </General>
    <Discovery>
      <Peers>
        <Peer address="192.168.7.2"/>
        <Peer address="127.0.0.1"/>
      </Peers>
    </Discovery>
    <Tracing><Verbosity>warning</Verbosity></Tracing>
  </Domain>
</CycloneDDS>
2.2 Olive device: ~/.ros/cyclonedds.xml
<?xml version="1.0" encoding="UTF-8"?>
<CycloneDDS xmlns="https://cdds.io/config"
            xmlns:xsi="http://www.w3.org/2001/XMLSchema-instance"
            xsi:schemaLocation="https://cdds.io/config https://raw.githubusercontent.com/eclipse-cyclonedds/cyclonedds/master/etc/cyclonedds.xsd">
  <Domain Id="any">
    <General>
      <Interfaces>
        <NetworkInterface address="192.168.7.2"/>
      </Interfaces>
      <AllowMulticast>false</AllowMulticast>
      <MaxMessageSize>65500B</MaxMessageSize>
    </General>
    <Discovery>
      <Peers>
        <Peer address="192.168.7.1"/>
        <Peer address="127.0.0.1"/>
      </Peers>
    </Discovery>
    <Tracing><Verbosity>warning</Verbosity></Tracing>
  </Domain>
</CycloneDDS>
Notes:
AllowMulticast=falseand explicit<Peers>implement the “locked-down” discovery behavior documented for Pro’s defaults; we simply bind to your USB-Ethernet NIC instead of loopback/host-only. docs.picknik.ai
Step 3 — Set environment variables
Tell ROS 2 to use Cyclone and point Cyclone to your XML. This is the standard mechanism in ROS 2/Cyclone DDS. docs.ros.org+1
Host (before starting MoveIt Pro):
export RMW_IMPLEMENTATION=rmw_cyclonedds_cpp
export CYCLONEDDS_URI="file://$HOME/.ros/cyclonedds.xml"
Olive device:
export RMW_IMPLEMENTATION=rmw_cyclonedds_cpp
export CYCLONEDDS_URI="file://$HOME/.ros/cyclonedds.xml"
If you persist these in ~/.bashrc, remember to open a new shell or source it. (Your DDS page already covers environment setup patterns.) Olive Robotics
Step 4 — Start MoveIt Pro (Docker) with host networking
Run Pro with --network host so the container shares the host’s network stack and can bind to 192.168.7.1 using your XML. This matches Pro’s documented container↔host DDS approach. docs.picknik.ai
docker run --rm -it --network host \
  -e RMW_IMPLEMENTATION=rmw_cyclonedds_cpp \
  -e CYCLONEDDS_URI="file://$HOME/.ros/cyclonedds.xml" \
  picknik/moveit_pro:latest
If you use the Pro SDK/compose setup, keep Cyclone as default; their SDK docs assume it. GitHub
Step 5 — Verify connectivity
- Start an Olive publisher/node on the device.
- In the Pro container (or host shell):
ros2 doctor --report    # confirm "middleware: rmw_cyclonedds_cpp"
ros2 node list
ros2 topic list
You should see Olive nodes/topics. (Your DDS page also recommends ros2 doctor and environment checks.) Olive Robotics
Optional tuning & multi-machine
- Larger data / images / point clouds: Adjust buffer sizes in the XML (
<MaxMessageSize>or advanced<Internal>watermarks) per Cyclone’s config reference. Cyclone DDS+1 - Add a second PC: Add each machine’s IP to every
<Peers>list and bind each to the interface it should use; keep multicast disabled for deterministic behavior. This is consistent with Pro’s “explicit peers” model beyond container↔host. docs.picknik.ai - Low-level sanity check:
ddsperf sanityfrom Cyclone can validate link quality outside ROS if you suspect network issues. GitHub
References
- MoveIt Pro — Configure ROS 2 DDS (Cyclone default; container↔host only by default). docs.picknik.ai
- MoveIt Pro SDK (expects Cyclone by default). GitHub
- Cyclone DDS — Configuration guide & XML schema; using
CYCLONEDDS_URI. Cyclone DDS+1 - ROS 2 —
RMW_IMPLEMENTATIONenvironment variable (choose Cyclone at runtime). docs.ros.org - Your existing DDS page (environment patterns; verification tips). Olive Robotics
If you want this as a PR-ready Markdown patch, say where to insert it (e.g., after your current “9) Data Distribution Service (DDS)”) and I’ll format it to match your repo’s style exactly.
