G1 Docs
Quick Start
Power On
Charge
Emergency Button
Drive
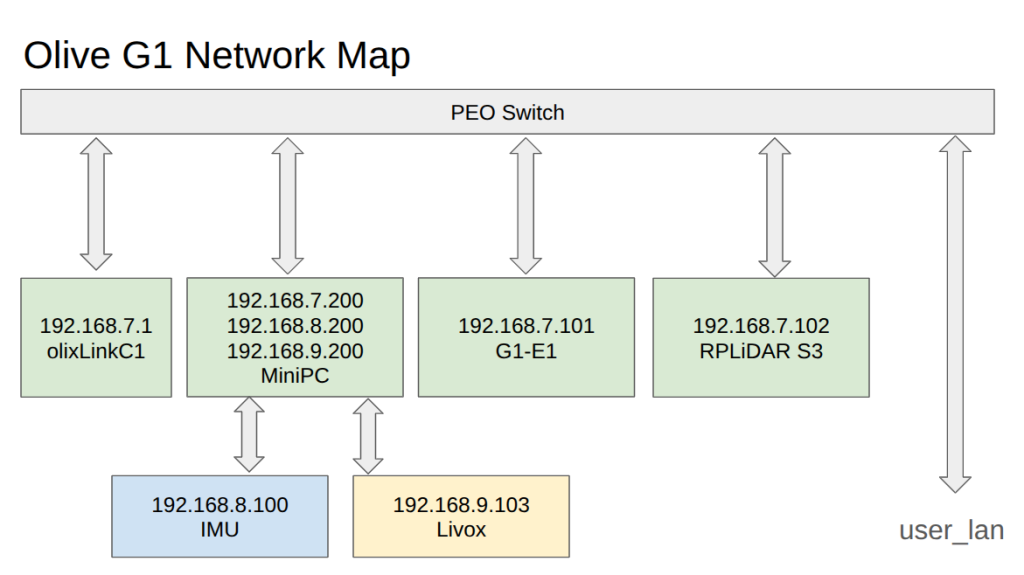
Network Map
ROS 2 & Cyclone DDS
The G1 runs per default on Cyclone DDS with the default settings. To get the data on your Host System you have to change also to Cyclone DSS
Install and Setup Cyclone DDS
- Install Cyclone DDS via following command
sudo apt install ros-humble-rmw-cyclonedds-cpp - Tell ROS 2 to change to cyclone via following command
export RMW_IMPLEMENTATION=rmw_cyclonedds_cpp - To make it permanent add the line above into the .bashrc
- If you want to have a specific config you can add a cusom config via following command
CYCLONEDDS_URI=path/to/custom/cyclone/config.xml
Adapting to Network Changes
ROS 2 can be very sensitive to network changes. In particular, when the currently preferred network interface (for example Ethernet/LAN) suddenly becomes unavailable and the system falls back to another interface (such as Wi-Fi), ROS 2’s discovery mechanism may stop working correctly. This behaviour can also occur when connecting to the G1 Router. In these cases, ROS 2 topics can appear “stuck” and no messages are shown anymore, even though the nodes are still running.
How to change the network then?
- Stop the ros2 daemon
ros2 daemon stop - Change your network (e.g. unplug LAN, connect to the G1 Router, adjust/remove the priority network, etc.).
- Start the ros2 daemon
ros2 daemon start
Prioritizing the G1 Network for ROS 2 Communication
If you are running two networks in parallel on your host system (for example, a regular LAN connection and the G1 network over Wi-Fi), your operating system may prioritize the non-ROS network by default. This can cause ROS 2 traffic to be sent over the “wrong” interface, leading to missing topics or unstable communication with the G1 system.
To ensure that ROS 2 (Cyclone DDS) uses the G1 network interface, you can provide a custom Cyclone DDS configuration that explicitly selects the desired interface:
<?xml version="1.0" encoding="UTF-8" ?>
<CycloneDDS xmlns="https://cdds.io/config"
            xmlns:xsi="http://www.w3.org/2001/XMLSchema-instance"
            xsi:schemaLocation="https://cdds.io/config https://raw.githubusercontent.com/eclipse-cyclonedds/cyclonedds/master/etc/cyclonedds.xsd">
    <Domain Id="any">
        <General>
            <Interfaces>
                <NetworkInterface name="G1 Network Interface Name"/>
                or
                <NetworkInterface address="Address" />
            </Interfaces>
            <AllowMulticast>true</AllowMulticast>
        </General>
    </Domain>
</CycloneDDS>
Replace "G1 Network Interface Name" with the actual name of the network interface used by the G1 router (as shown by ip a, ifconfig, or your OS’s network settings).
Then restart the ROS 2 daemon with this configuration:
ros2 daemon stop
export CYCLONEDDS_URI=file:///path/to/custom/cyclone_dds/config.xml
ros2 daemon start
With this setup, Cyclone DDS will prefer the specified G1 interface for ROS 2 communication, even if another network (such as LAN) is otherwise prioritized by the host system.
To make it permanent add the line export CYCLONEDDS_URI=/path/to/custom/cyclone_dds/config.xml
into your .bashrc
Navigation and Mapping
To run the Mapping, Navigation and the Waypoint Server, please download the G1 repository in your ros2 workspace first. (see how to create a ros2 workspace)
SSH Access
The computer of the robot can be accessed over ssh.
- Connect to the WIFI router of the robot: SSID: olixLink-C1 PW: olixLink
- ssh with following command: ssh firefly@192.168.7.200. (or: 192.168.7.98). PW: one
Mapping / SLAM
The SLAM part is done in three steps
- Visualization
- Mapping
- Saving the Map
Visualization
To visualize the mapping process rviz2 is used:
- To visualize the mapping process there is a rviz2 file called g1_slam.rviz in the G1 repository
- Run following command in your host system: ros2 run rviz2 rviz2 -d path_to_rviz2_file
Mapping
- SSH into the robot
- Run the slam.sh script under the scripts directory. This stars the mapping.
- Now you should see a map, when driving with the robot the map should be updated
Saving the Map
- SSH into the robot
- Run following command to save the map: ros2 run nav2_map_server map_saver_cli -f map
This will save a map.pgm and a map.yaml file.
Behind the -f flag you can also add a path e.g. /home/maps/first_map - Now you map is saved and can be used for navigation
Navigation
The Navigation part is done in four steps:
- Run Navigation
- Visualization
- Initialize a Position
- Send a Position
Navigation
- SSH into the robot
- Run the
navigation.sh --map map.yamlscript under the scripts directory. This stars the navigation.--map: Path to the previous created map (is has to be the *.yaml file) - Please check the map is loaded in rviz2 (maybe restart rviz2)
Visualization
To visualize the navigation process rviz2 is used (it should be run after the navigation is started):
- To visualize the navigation process there is a rviz2 file called g1_navigation.rviz in the G1 repository
- Run following command in your host system: ros2 run rviz2 rviz2 -d path_to_rviz2_file
Initialize a Position
- To initialize a position open rviz2 and go to 2D Pose Estimate. And place the robot roughly where the robot is located in the map
- Turn the robot manually 3 to 4 times by himself, so that amcl is adjusting the robots position. You should see it in rviz2, that he is adjusting his position (lasers are align to the wall)
Navigate to a Position
Via Rviz
- Now you can send a goal via Nav2 Goal in rviz2
- You should see a planned path which is then driven by the robot (Please be sure that the controller is not actively in use (robot light are blue), if yes, press the RT or LT Button to deactivate the controller).
Via CLI
To send a goal via cli or api an action server called /navigate_to_pose is available.
Example:
ros2 action send_goal /navigate_to_pose nav2_msgs/action/NavigateToPose "pose:
  header:
    stamp:
      sec: 0
      nanosec: 0
    frame_id: 'map'
  pose:
    position:
      x: 1.0
      y: 0.0
      z: 0.0
    orientation:
      x: 0.0
      y: 0.0
      z: 0.0
      w: 1.0
behavior_tree: '' "
Waypoint Server
With the Waypoint server it is possible to save a point on the map and let the robot moves to these points via a ros2 service call.
| Available ROS 2 Service | Description |
|---|---|
| list_waypoints | List all available waypoints |
| save_waypoint | Save the current robot position as waypoint |
| save_waypoint_pose | Save a given pose as waypoint |
| delete_waypoint | Delete a waypoint |
| move_to_waypoint | Drive to a waypoint, by the waypoint name |
Setup
The waypoint server runs on the robot itself, but on the host system the interfaces/msgs are necessary, so that it`s possible to send some services.
# 1. Clone the G1 Respository
git clone https://github.com/olive-robotics/olvx_g1

# 2. Create a ros2 workspace
mkdir -p ~/ros2_ws/src

# 3. Copy the waypoint_server_interfaces into ros2 workspace src
cp -r waypoint_server_interfaces ~/ros2_ws/src

# 4. Go into the ros2 workspace
cd ~/ros2_ws

# 5. Build the package
colcon build --symlink-install --packages-select waypoint_server_interfaces

# 6. Source your workspace
source install/setup.bash

# 7. To source it permanent add the source into .bashrc
source $HOME/ros2_ws/install/setup.bash >> ~/.bashrc
Getting Started
- Run the navigation script from above, this will also start the waypoint server
List all Waypoints
You can list all waypoint with following command:
ros2 service call /waypoint_server/list_waypoints waypoint_server_interfaces/srv/ListWaypoints {}\ Save a Waypoint
You can save a waypoint in two ways:
- Manual via cli
- Current robot base as waypoint
Manual
To save the via cli run following command, the pose is set in the map frame:
ros2 service call /waypoint_server/save_waypoint_pose waypoint_server_interfaces/srv/SaveWaypointPose "name: 'wp_1'
pose:
  position:
    x: 2.0
    y: 0.0
    z: 0.0
  orientation:
    x: 0.0
    y: 0.0
    z: 0.0
    w: 1.0"
Save current robot base as waypoint
ros2 service call /waypoint_server/save_waypoint waypoint_server_interfaces/srv/SaveWaypoint "name: 'wp_1'"Delete a Waypoint
To delete a waypoint you can run following command
ros2 service call /waypoint_server/delete_waypoint waypoint_server_interfaces/srv/DeleteWaypoint "name: 'wp_1'"Drive to a Waypoint
You can drive to a saved waypoint with following command:
ros2 service call /waypoint_server/move_to_waypoint waypoint_server_interfaces/srv/MoveToWaypoint "name: 'wp_1'" Troubleshooting
Laser not available or waiting for laser_scans
If the Laser is not available, of the command journalctl -u g1_startup -f spams Waiting for laser_scans or
when starting slam or navigation is not working. Try to restart the mini-pc otherwise you can try to restart the bot.
Process killed by OMM Killer
It can happen that the OMM Killer killed the navigation or slam process. If this happens follow these steps:
- Kill als ros2 nodes running on your host system (also ros2 daemon with ros2 daemon stop)
- Remove shm files
sudo rm -rf /dev/shm/fast* /dev/shm/fastrtps* /dev/shm/rtps_* - Restart Computer
Map Saver: Failed to spin map subscription
When saving the map there could be an error like:
[map_saver]: Failed to spin map subscriptionThis happens sometimes, retry to save the map until it works.
3D SLAM FAST LIO
The Fast Lio SLAM uses an IMU and a 3D Lidar and creates a 3D Map out of it.
Run the Livox Lidar
- Build the livox lidar following these instructions
- Connect to the Livox Lidar via LAN and setup your host system with the IP Address 192.168.9.200 and MAC-Address 255.255.255.0.
- Replace the MID360.json file in the /livox_ws/src/livox_ros_driver2/config with this content
- Rebuild the livox lidar package
- Run the following command:
ros2 launch livox_ros_driver2 msg_MID360_launch.py
Hint: If you only want to run the livox lidar without fast lio for ros2 run following command: ros2 launch livox_ros_driver2 rviz_MID360_launch.py. Then it is in the ros2 pointcloud message
Run FAST LIO
- Build Fast Lio following these instructions
- Source the workspace of the livox_lidar and the fast lio
- Run Fast LIO with following command:
ros2 launch fast_lio mapping.launch.py config_file:=mid360.yaml
Hint: Do not run this via ssh, otherwise it will not work. It needs a display
