Description #
Outdoor ready 5G router, armed with a six-antenna array for wide-range, full-coverage, gives your robot an encrypted VPN link for real-time control and support from anywhere. OlixLink™ C1 ensures your robot never loses connection, whether in a lab, factory, or outdoors. With global 5G NR SA/NSA support and dual SIM slots, it automatically switches networks to keep the link alive. Add Wi-Fi 6 dual-band performance, and you’ve got seamless coverage for both research and industrial environments.
Key Features #
- Worldwide Remote Access via 5G VPN tunnel
- Real-Time Teleportation & Support
- Dual-SIM
- Zero-Effort Setup
- Highly Secure
- Flexible Connectivity
- Outdoor-Ready Durability
- ROS 2 native node to see the status of olixLink™ C1
Technical Specification #
General Specification #
| Feature | Description |
|---|---|
| Dimensions (W x H x D) | 135mm x 140mm x 45mm |
| Weight | 760 gramm |
| IP-rating | IP66 |
WiFi Specification #
| Feature | Description |
|---|---|
| Version | WiFi 6 |
| Dual-Band | 5Ghz & 2.4Ghz connectivity |
| Speed | Up to 2400Mpbs (5.8GHz) & 600Mbps (2.4 GHz) |
| Compatibility | IEEE 802.11b/g/n / AC / AX |
| Antennas | 6 Antennas (4 for 5G and 2 for WiFi 6) |
Power #
| Feature | Description |
|---|---|
| Power Consumption | Gigabit POE+ Interface |
| Type | One Ethernet Cable for power and data |
| Voltage | 48V/1A |
Quick Start #
Unboxing and Setup #
Connection & Log In #
To connect to the C1 and get access to the router settings please follow these steps:
- Go to WiFi Settings
- Select the WiFi with the name olixLink-C1
- Enter the password: olixLink
- Open a web browser
- Enter the IP address 192.168.7.1
- The Username is admin and the password olixLink
ROS 2 and DDS Integration #
General #
The OlixLink™ C1 device provides its own ROS 2 node that publishes a status topic to report the current state of the unit. Once the connection to the router is established, the node publishes to the topic: /olive/olixLink/c1/id001/status with the message type diagnostic_msgs/msg/DiagnosticArray
This node is natively integrated with Eclipse Cyclone DDS, but the status topic remains discoverable and accessible even if the host system is using a different DDS implementation.
The Status message contains following information:
WiFi 5G and WiFi 2.4G Status #
| Value | Description |
|---|---|
| ESSID | The WiFi name |
| Frequency | The frequency of the WiFi |
| Signal level | How good is the signal of the WiFi in dBm |
| Received data | Received data in bytes per second |
| Transmitted data | Received data in bytes per second |
Memory Status #
| Value | Description |
|---|---|
| Total Memory | Total memory in kB |
| Used memory | Used memory in kB |
| Remaining memory | free memory in kB |
Sim Card Status #
| Value | Description |
|---|---|
| Status | Sim Card is available or not, Values: UP | DOWN |
| Received data | Received data in bytes per second |
| Transmitted data | Received data in bytes per second |
Network Latency #
An IP address can be configured through the ROS 2 parameters. Once set, the OlixLink™ C1 status node will periodically measure and report the latency between the device and the specified IP address, providing valuable network performance insights as part of its diagnostic data.
| Value | Description |
|---|---|
| IP Address | Shows the chosen IP address |
| Latency | Latency in ms |
ROS 2 Configurations #
The ROS 2 Configuration can be changed via Web GUI.
- Connect your device to the olixLink™ C1
- Open a web browser and navigate to: http://192.168.7.1
- Log In to the Router Interface (username: admin, pw: olixLink)
- In the sidebar, click on ROS 2 Settings. (if not available press F5)
- On the Web GUI now you can change the ROS 2 Domain ID, the topic namespace, the latency address and select an ntp/ptp server
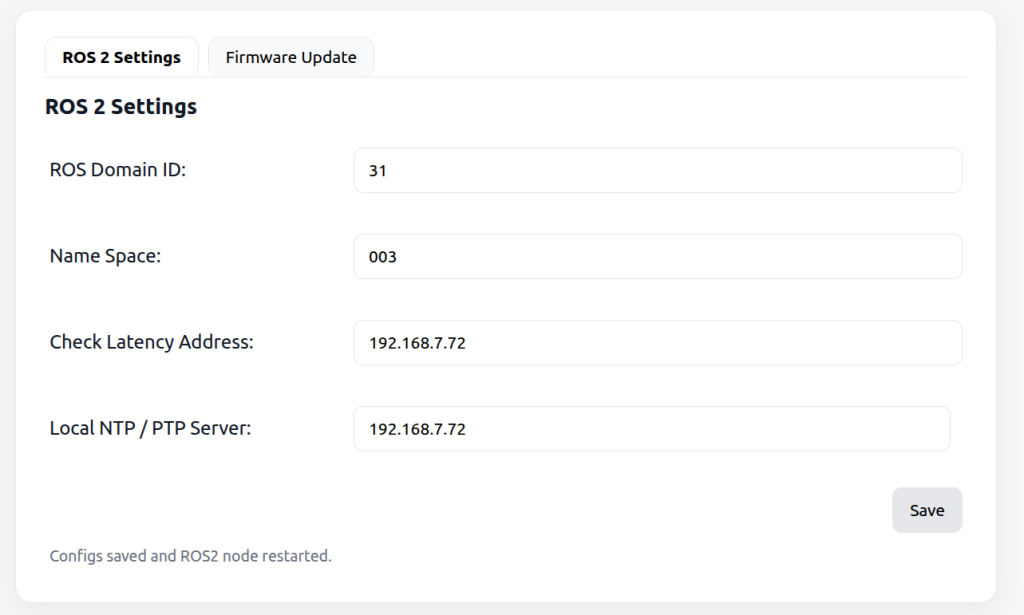
Here is a more detailed description of those parameters
| Value | Description |
|---|---|
| ROS Domain ID | Change the ROS domain ID of the router |
| Name Space | Change the Name Space of the C1 status topic |
| Check Latency Address | Add an IP address to check the latency |
| Local NTP / PTP Server | Add IP address of an ntp server to sync the C1 time with your host system time |
Update Firmware #
To update the firmware of the olixLink™ C1 ROS 2 node follow these steps:
- Connect your device to the olixLink™ C1
- Open a web browser and navigate to: http://192.168.7.1
- Log In to the Router Interface (username: admin, pw: olixLink)
- In the sidebar, click on ROS 2 Settings. (if not available press F5)
- Switch to the Firmware Update tab
- Upload our released olixLink™ C1 firmware
- Wait until upload is finished
- Restart the router
Sim Card #
To add a SIM Card to the olixLink™ C1 follow these steps
- Insert your SIM card into one of the two SIM card slots on the olixLink™ C1.
- Connect your device to the olixLink™ C1.
- Open a web browser and navigate to: http://192.168.7.1
- When prompted, enter the SIM card PIN to unlock the card
- Log In to the Router Interface (username: admin, pw: olixLink)
- Go to 5G Network → 5G Info to check the SIM card’s connection status
- Check on the ROS2 Status Topic (/olive/olixLink/c1/id001/status) if SIM Card is up
- Open the CLI (Command Line Interface) and test connectivity
ping 8.8.8.8 - In the network settings, change the Network Latency Address to a reliable host (e.g., Google DNS:
8.8.8.8
