Windows
In windows you can use virtualization tools like VirtualBox to setup ROS 2 environement and use Olive products. Windows natively supports RNDIS (Remote Network Driver Interface Specification) but not ECM (Ethernet Control Model), which is commonly used in Linux or macOS environments for USB networking via the USB CDC class. We have switched to ECM to have a better support on MAC and Linux and in Windows you can direct connect your device to VirtualBox and have the topics. We have a feature to switch between RNDIS or ECM from paramters in Olive Components.
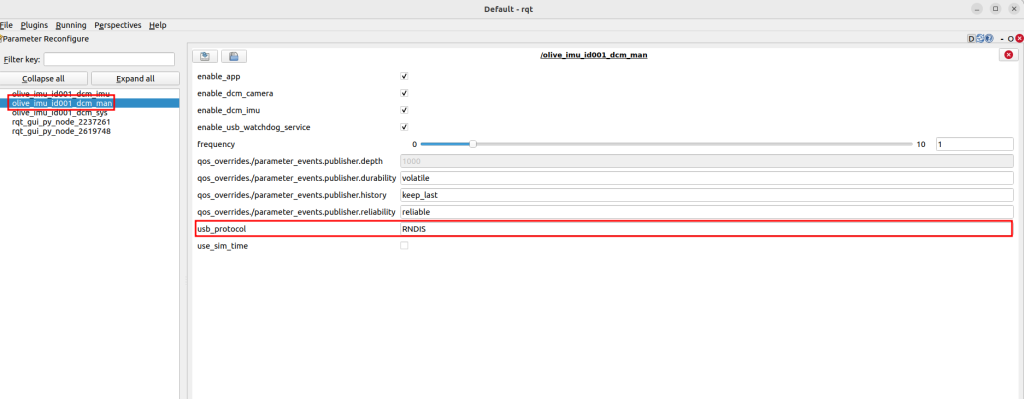
If you are using USB version of Olive Components, please make sure the usb_protocol from manager is set to RNDIS. If you are using Linux or MacOS change this back to ECM.
You change this via ROS 2 params in manager or using RQT and Plugins -> Dynamic Reconfigure.
Oracle® VM VirtualBox
VirtualBox is a powerful, open-source, cross-platform virtualization software developed by Oracle Corporation. It enables users to create and run multiple virtual machines (VMs) on a single physical computer, effectively mimicking the functionality of multiple separate computers running different operating systems. This allows users to test and develop software, run legacy applications, or experiment with new operating systems without the need for additional hardware. VirtualBox is widely used by developers, IT professionals, and enthusiasts for its ease of use, flexibility, and extensive feature set, making it a valuable tool for managing and deploying diverse computing environments.
Olive® VBox Image
You can download a preconfigured Virtual Box image from here:
The username and password for this instance is “olive” and “one”.
Quick Setup (Windows)
- First install the Virtualbox on your host computer (https://download.virtualbox.org/virtualbox/7.0.8/VirtualBox-7.0.8-156879-Win.exe)
- To be able to communicate with Olive Component through Virtualbox you have to first connect the Olive component to your host computer and make sure you can ping the device successfully. You should aslo see the network adapter on your windows.
ping 192.168.7.1

Pinging 192.168.7.1 with 32 bytes of data:
Reply from 192.168.7.1: bytes=32 time=1ms TTL=64
Reply from 192.168.7.1: bytes=32 time<1ms TTL=64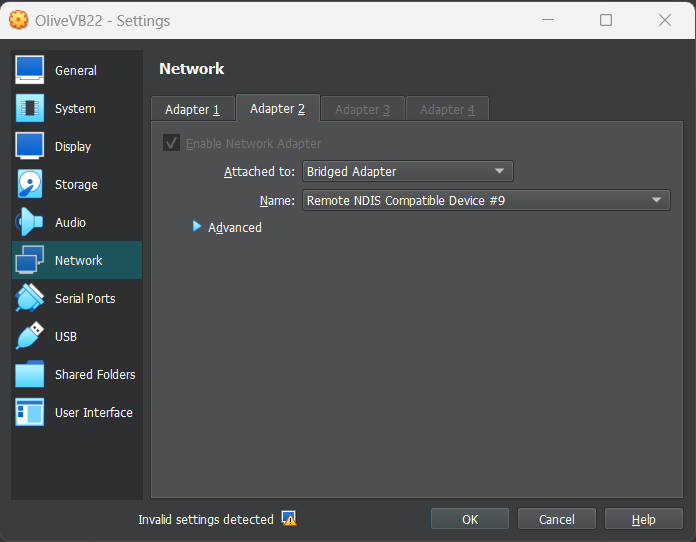
Reply from 192.168.7.1: bytes=32 time<1ms TTL=64- Check the name of your olive network on windows, in our example the name is “Remote NDIS Compatible Device #9”:

- Then open your Virtualbox’s settings and go to “Network”. You can only add networks when the geust OS is off so shutdown the geust Ubuntu then come back here!. One you could add a Network adapter, select Attached to: “Bridged Adapter”, then Name: “Remote NDIS Compatible Device #9” (The same name in step2).
- Then go to your guest Ubuntu and set a static IP for your machine. It should be in the same range of Olive component’s IP (10.42.0.X), here we selected 10.42.0.101. Network configuration is located in the Settings menu in Ubuntu.

- Then disable and enable the network adapter in Ubuntu by the slider checkbox. Now you should be able to ping your device from the Virtual Ubuntu.


ping 192.168.7.1

PING 192.168.7.1 (192.168.7.1) 56(84) bytes of data.

64 bytes from 192.168.7.1: icmp_seq=1 ttl=64 time=1.53 ms

64 bytes from 192.168.7.1: icmp_seq=2 ttl=64 time=0.869 ms

--- 192.168.7.1 ping statistics ---

2 packets transmitted, 2 received, 0% packet loss, time 1002ms

rtt min/avg/max/mdev = 0.869/1.198/1.528/0.329 ms- Now you can use all the ROS2 related tools here. For example you can see the topics with:
ros2 topic list

/olive/actuator/pan/goal/position
/olive/actuator/pan/joint
/olive/actuator/pan/joint/voltage
/olive/actuator/pan/led
/olive/actuator/pan/magnet/angle
/olive/actuator/pan/magnet/auto_gain
/olive/actuator/pan/magnet/diagnostic
/olive/actuator/pan/magnet/magnitude
/olive/actuator/pan/magnet/moving_average
/olive/actuator/pan/status
/olive/actuator/pan/switch
/parameter_events
/rosout